

Steak is more than just a meal, it’s a culinary experience. Whether you’re firing up the grill for a weekend barbecue, preparing a romantic dinner, or trying your hand at gourmet cooking, steak offers endless possibilities.
Cooking the perfect steak begins with understanding your ingredients, and few ingredients command as much respect as a quality cut of beef. Whether you’re firing up the grill for a weekend barbecue, preparing a romantic dinner, or trying your hand at gourmet cooking, mastering this culinary art offers endless possibilities for creating memorable dining experiences.
This comprehensive guide walks you through everything you need to know about selecting, preparing, and cooking steak to perfection. From understanding different cuts to mastering techniques like searing, slicing, and resting, this resource serves as your complete reference for elevating your culinary skills.
Whether you’re a beginner taking your first steps into serious cooking or a seasoned home chef looking to refine your techniques, you’ll find expert advice, step-by-step instructions, and delicious recipes to transform your approach to this timeless protein.
Table of Contents
What Is Steak? Understanding the Basics
A well-prepared steak represents one of cooking’s most fundamental yet sophisticated challenges. This protein refers to a portion of meat, typically beef, that is sliced across the muscle fibers and prepared through various cooking methods including grilling, pan-searing, or broiling.
The beauty of steak lies in its incredible diversity. Each cut offers unique characteristics in terms of flavor profile, texture, and optimal preparation methods. Understanding these differences forms the foundation of successful cooking and helps you make informed decisions when selecting meat for your meals.
“The art of cooking beef isn’t just about heat and time, it’s about understanding the relationship between the cut, the cooking method, and the final result you want to achieve.” – Chef Thomas Keller
Quality steak is prized for its rich, complex flavor profile, satisfying texture, and remarkable versatility. The way muscle fibers are structured, the amount of marbling (intramuscular fat), and the location of the cut on the animal all contribute to the final eating experience.
Understanding Beef Grades
The USDA grading system provides valuable insight into quality:
| Grade | Characteristics | Best Uses |
|---|---|---|
| Prime | Abundant marbling, exceptional tenderness | Special occasions, high-end restaurants |
| Choice | Good marbling, very tender | Everyday cooking, grilling |
| Select | Minimal marbling, lean | Marinades, slow cooking methods |
Different cooking methods bring out unique qualities in each cut. Whether you prefer your meat rare, medium, or well done, there’s a preparation method and cut that suits your taste preferences and cooking style.
How to Choose the Right Cut
Selecting the appropriate steak depends on several factors including your cooking method, budget constraints, and flavor preferences. Understanding the characteristics of popular cuts empowers you to make confident decisions at the butcher counter or grocery store.
The location of the steak on the animal significantly impacts its tenderness and flavor. Cuts from less-worked muscles tend to be more tender but may have less flavor, while cuts from more active muscles offer robust flavor but require careful preparation to achieve optimal tenderness.
Premium Cuts for Special Occasions
Ribeye: This steak comes from the rib section and features exceptional marbling throughout. The abundant fat content creates a rich, juicy eating experience with intense beef flavor. Ribeye performs exceptionally well when grilled or pan-seared over high heat.
Filet Mignon: Cut from the tenderloin, this represents the most tender option available. While it lacks the robust flavor of more marbled cuts, its buttery texture makes it perfect for special occasions when prepared with complementary seasonings and sauces.
Versatile Everyday Options
NY Strip: Also known as the Kansas City strip, this cut balances flavor and tenderness effectively. It features good marbling and a firm texture that holds up well to various cooking methods.
Sirloin: An economical choice that doesn’t sacrifice quality. While leaner than premium cuts, sirloin offers excellent value and works well in numerous applications from grilling to stir-frying.
Flavorful Cuts for Marinating
Flank and Skirt: These lean, flavorful cuts benefit significantly from marinating. Their pronounced beef flavor and fibrous texture make them ideal for fajitas, stir-fries, and other dishes where the meat will be sliced thin.
| Cut | Tenderness | Flavor Intensity | Best Cooking Methods |
|---|---|---|---|
| Filet Mignon | Extremely Tender | Mild | Pan-searing, grilling |
| Ribeye | Very Tender | Very Rich | Grilling, pan-searing |
| NY Strip | Tender | Rich | Grilling, broiling |
| Sirloin | Moderately Tender | Moderate | Grilling, pan-frying |
| Flank | Tough (when improperly cut) | Very Rich | Marinating, slicing thin |
Learn more:
👉 How to choose beef steak: A comprehensive guide
T-Bone Steak: The Perfect Grilling Guide
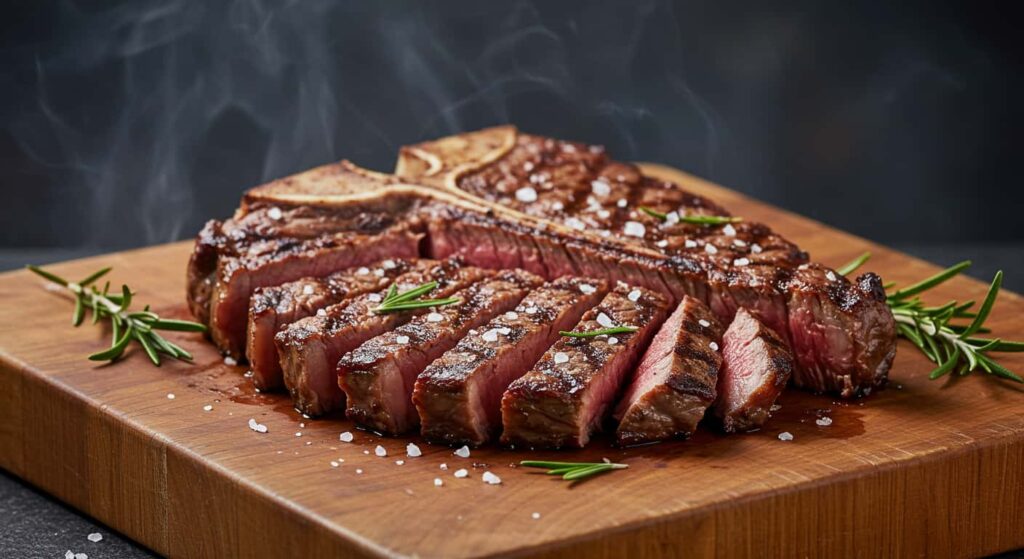
The T-bone represents one of the most iconic cuts in American grilling culture. This distinctive cut features a T-shaped bone with meat on both sides, a strip portion on one side and a smaller tenderloin section on the other. This unique structure provides two different eating experiences in a single cut.
Understanding the dual nature of T-bone cuts is crucial for proper preparation. The strip side offers more robust flavor and firmer texture, while the tenderloin side provides exceptional tenderness with a milder taste. This difference requires careful attention during cooking to ensure both sides reach optimal doneness simultaneously.
Preparation Techniques for T-Bone Success
Temperature control plays a vital role in T-bone preparation. Remove the steak from refrigeration 30-45 minutes before cooking to allow it to reach room temperature. This ensures even cooking throughout the steak and prevents the exterior from overcooking while the interior remains cold.
Seasoning should be simple yet effective. Coarse salt and freshly cracked black pepper applied generously 40 minutes before cooking allows the seasoning to penetrate the meat surface. The salt draws out moisture initially, then the meat reabsorbs this moisture along with the seasoning, creating enhanced flavor throughout.
Grilling Methodology
Preheat your grill to high heat, aiming for temperatures around 450-500°F. Clean and oil the grates to prevent sticking. Place the T-bone over direct heat and sear for 3-4 minutes per side, creating attractive grill marks and developing a flavorful crust.
After searing, move the meat to indirect heat or reduce the temperature to medium. Continue cooking until the internal temperature reaches your desired doneness. The strip side typically cooks faster than the tenderloin, so position the T-bone with the strip side facing the cooler area of the grill.
Resting and Serving
Allow the cooked steak to rest for 5-10 minutes before slicing. This resting period allows juices to redistribute throughout the meat, ensuring each bite remains moist and flavorful. Tent loosely with foil to maintain temperature during resting.
When serving, consider the different characteristics of each side. Some diners prefer the robust flavor of the strip side, while others gravitate toward the tenderloin’s exceptional tenderness.
Explore more:
👉 T-bone steak perfect grilling guide
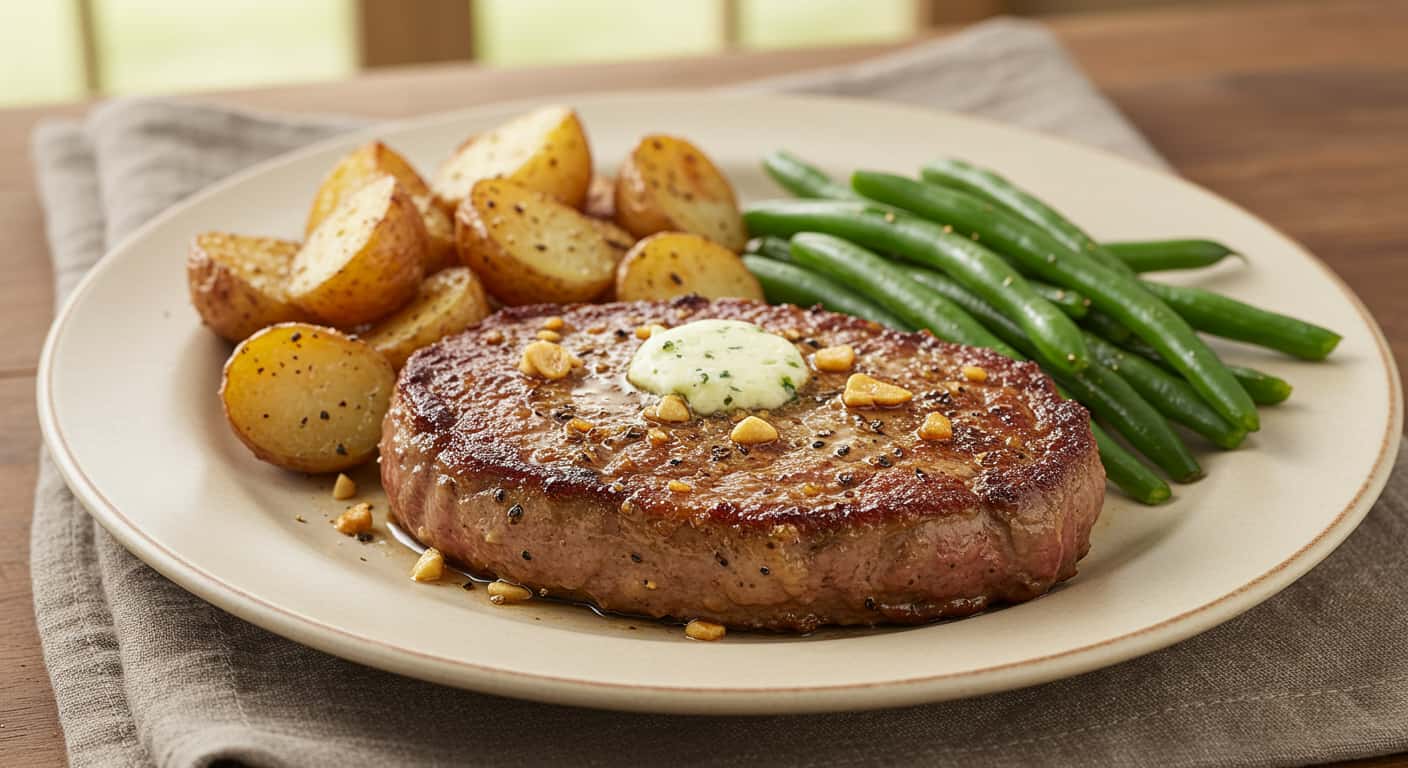
NY Strip Steak: Flavor and Technique
The NY strip, also known as the Kansas City strip, represents the perfect balance between tenderness and flavor intensity. This steak comes from the short loin section of the animal and features excellent marbling that contributes to its reputation as a premium grilling choice.
The strip’s firm texture and rich flavor profile make it exceptionally versatile. It responds well to high-heat cooking methods and maintains its structure beautifully when sliced. The moderate fat content provides sufficient juiciness without being overly rich, making it appealing to a wide range of palates.
Selecting Quality NY Strip
When choosing NY strip cuts, look for even thickness throughout the piece, typically 1 to 1.5 inches thick. The meat should display good marbling with thin streaks of fat distributed throughout. Avoid cuts with excessive external fat caps, as these can cause flare-ups during grilling.
Color should be bright red with no gray or brown areas. The fat should appear creamy white rather than yellow, indicating freshness. If purchasing from a butcher, don’t hesitate to ask about the aging process, as properly aged beef develops more complex flavors.
Cooking Techniques for Optimal Results
Bring the steak to room temperature before cooking, which typically takes 30-45 minutes depending on thickness. This step ensures even cooking and prevents the exterior from overcooking while waiting for the interior to reach the proper temperature.
For pan-searing, use a heavy-bottomed pan such as cast iron. Heat the pan over medium-high heat until it’s hot but not smoking. Add a small amount of high-heat oil like avocado or grapeseed oil, then carefully place the seasoned strip in the pan.
Cook for 3-4 minutes per side for medium-rare, adjusting time based on thickness. The steak should develop a beautiful golden-brown crust while maintaining a pink interior. Use tongs to flip the meat only once to avoid disrupting the searing process.
Flavor Enhancement Strategies
While NY strip has excellent natural flavor, simple enhancements can elevate the dining experience. Compound butter made with herbs like thyme or rosemary adds richness and aromatic complexity. Apply the butter during the last minute of cooking for optimal flavor integration.
Consider finishing with a splash of high-quality aged balsamic vinegar or a sprinkle of flaky sea salt. These additions complement rather than mask the beef’s natural flavors.
Explore more:
👉 How to cook NY strip steak
Flank Steak: Lean, Flavorful, and Versatile
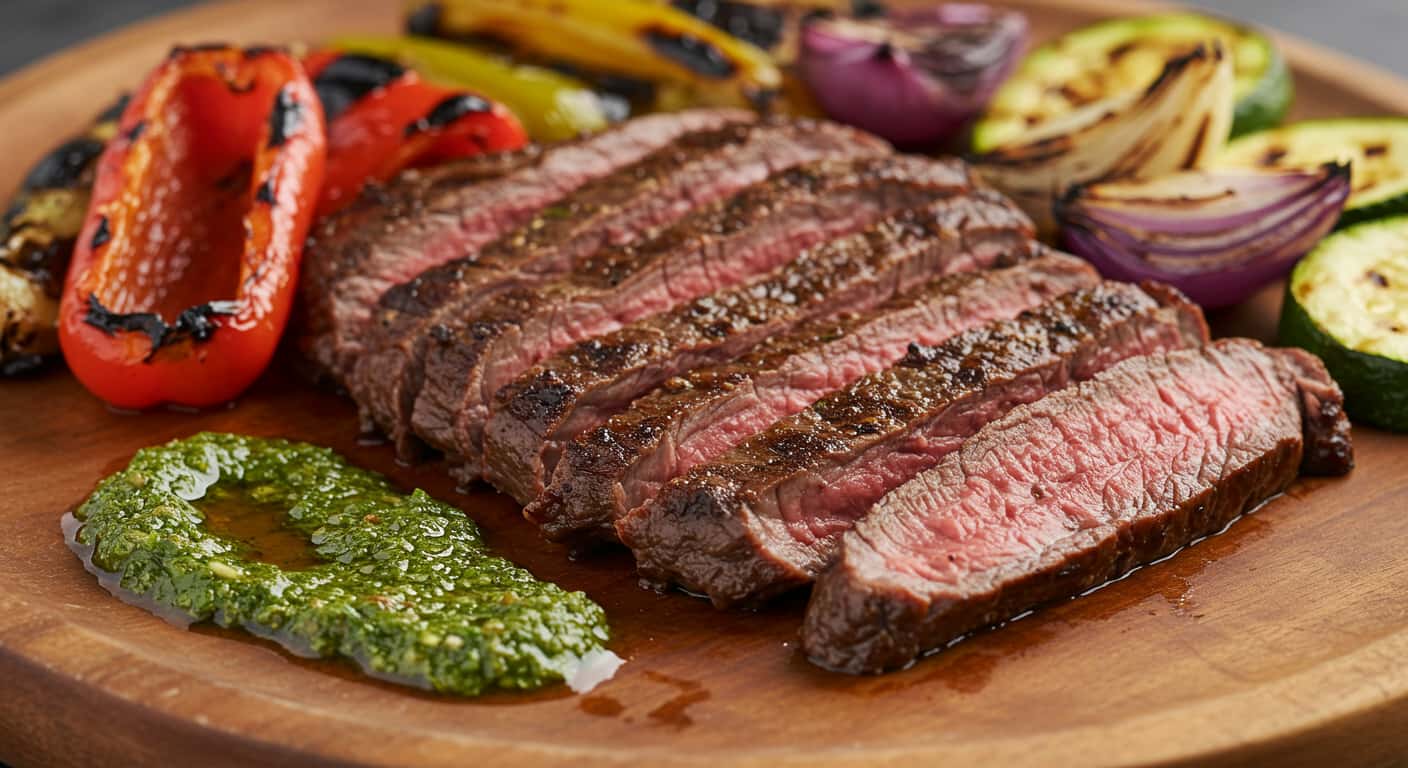
Flank represents one of the most under appreciated cuts in the beef world. This steak, fibrous cut comes from the abdominal muscles of the animal and offers intense beef flavor at an affordable price point. While it requires specific preparation techniques to achieve optimal tenderness, the results justify the extra attention.
The key to success with flank lies in understanding its muscle structure. The long, pronounced grain requires careful slicing technique, while the lean nature benefits significantly from marinating. When prepared correctly, flank delivers exceptional flavor and versatility that makes it suitable for numerous culinary applications.
Marinating for Maximum Impact
Flank’s steak composition makes it an ideal candidate for marinades. The muscle fibers readily absorb flavors, while acidic ingredients help break down tough connective tissues. Effective marinades combine acid (citrus juice, vinegar, or wine), oil, and seasonings.
A basic marinade might include olive oil, lime juice, garlic, cumin, and chili powder for a Mexican-inspired flavor profile. For Asian applications, consider soy sauce, rice vinegar, ginger, and sesame oil. Marinating time should be at least 2 hours, though overnight marinating produces superior results.
High-Heat Cooking Methods
Flank performs best when cooked quickly over high heat. This approach creates a flavorful crust while keeping the interior tender and juicy. Grilling, broiling, or pan-searing in a very hot skillet all work effectively.
Cook the marinated flank for 4-6 minutes per side, depending on thickness. The goal is to achieve a well-developed crust while maintaining a pink interior. Overcooking results in tough, chewy texture that no amount of proper slicing can remedy.
Applications and Serving Suggestions
Flank’s versatility shines in various culinary contexts. Sliced thin against the grain, it makes excellent fajita filling, stir-fry protein, or sandwich meat. The robust flavor holds up well to bold seasonings and sauces.
Consider using leftover flank in salads, grain bowls, or pasta dishes. The meat’s ability to absorb flavors makes it an excellent choice for fusion cuisine that combines different culinary traditions.
| Preparation Method | Cooking Time | Internal Temperature | Best Uses |
|---|---|---|---|
| Grilling | 4-6 minutes per side | 130-135°F | Fajitas, slicing |
| Pan-searing | 3-5 minutes per side | 130-135°F | Stir-fries, salads |
| Broiling | 4-6 minutes per side | 130-135°F | Sandwiches, wraps |
Explore more:
👉 Flank steak guide
How to Cut Flank Steak into Thin Slices
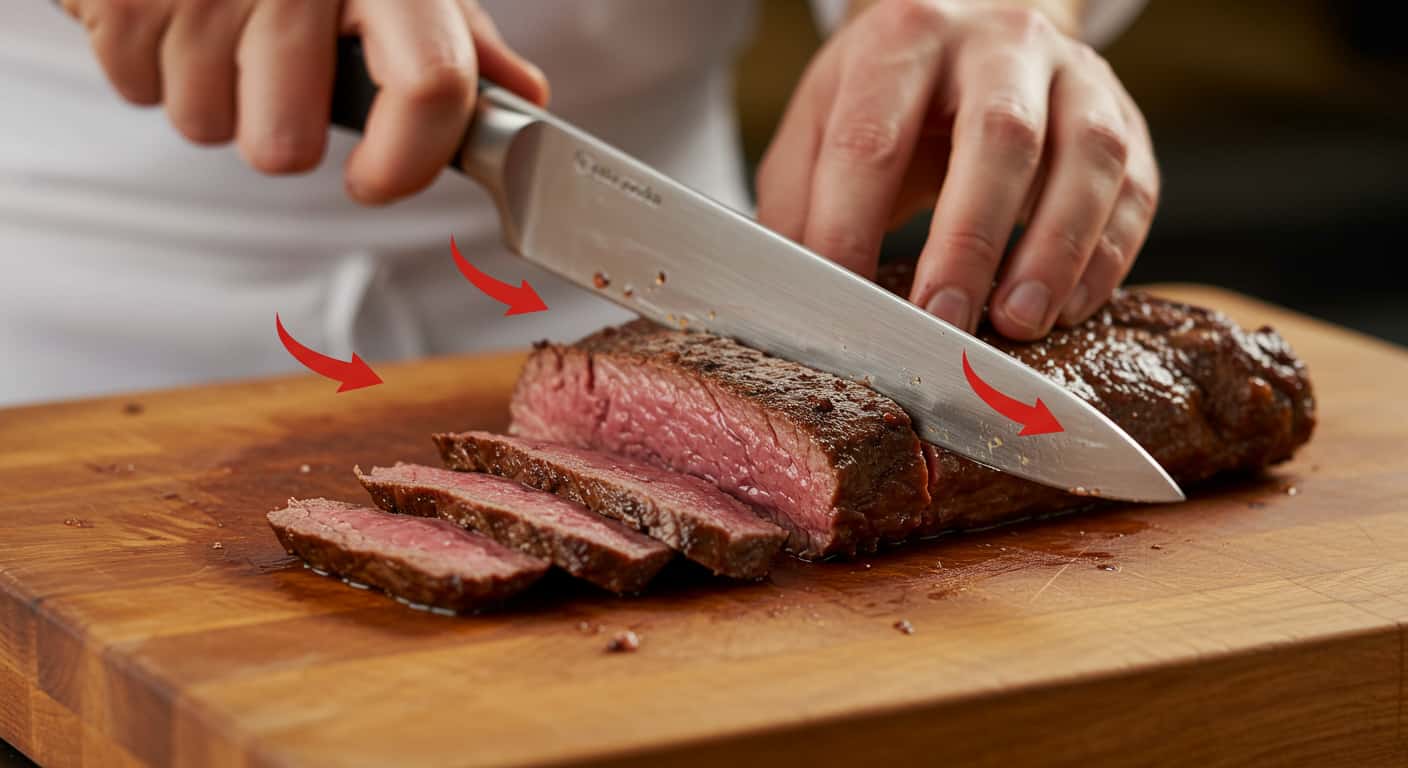
Proper slicing technique transforms flank from a potentially tough cut into tender, flavorful portions. The key lies in understanding muscle fiber direction and cutting perpendicular to these fibers. This technique, known as cutting against the grain, shortens the muscle fibers and creates more tender bites.
Identifying the Grain
Before cutting, examine the cooked flank carefully. The grain appears as parallel lines running through the meat, indicating the direction of muscle fibers. These lines are usually quite pronounced in flank, making grain identification relatively straightforward.
The grain typically runs lengthwise along the cut, though it can vary slightly depending on how the butcher prepared the piece. Take time to identify the grain direction before making your first cut, as this determines the success of your slicing technique.
Essential Tools and Setup
Use a sharp, thin-bladed knife for clean cuts through the meat. A dull knife will tear the fibers rather than cutting cleanly, resulting in a less appealing texture. A carving knife or sharp chef’s knife works well for this task.
Position a cutting board on a stable surface and ensure adequate lighting to see the grain clearly. Have a serving platter ready to receive the sliced meat, as flank is best served immediately after slicing.
Step-by-Step Slicing Process
Allow the cooked flank to rest for 5-10 minutes before slicing. This resting period allows juices to redistribute throughout the meat, preventing excessive juice loss during cutting.
Position the knife perpendicular to the grain direction and slice with smooth, confident strokes. Aim for slices approximately 1/4 inch thick, though slightly thinner slices work well for applications like fajitas or stir-fries.
Maintain consistent slice thickness throughout the piece. Uniform slices ensure even eating experience and professional presentation. If the meat begins to tear rather than cut cleanly, your knife may need sharpening.
Serving and Presentation
Arrange the sliced flank on a warmed serving platter, slightly overlapping the pieces for attractive presentation. Consider garnishing with fresh herbs or a drizzle of finishing sauce to enhance visual appeal.
Serve immediately while the meat is still warm. Flank can become less tender as it cools, so timing the slicing with service ensures optimal eating experience.
Learn more:
👉 How to cut flank steak into thin slices
Filet Mignon: Grilling the Most Tender Cut
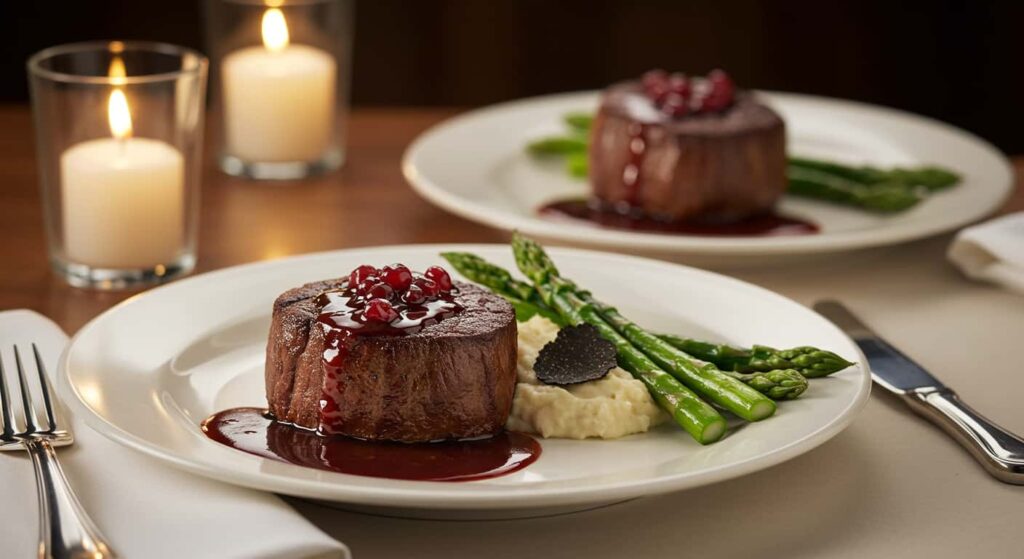
Filet mignon represents the pinnacle of tenderness in beef cuts. Sourced from the tenderloin, this steak offers an unparalleled buttery texture that melts in your mouth when properly prepared. While it lacks the robust flavor of more marbled cuts, its exceptional tenderness makes it a favorite for special occasions and fine dining.
The tenderloin’s position along the animal’s backbone means it experiences minimal muscle activity, resulting in incredibly tender meat with fine muscle fibers. This characteristic requires gentle handling and precise cooking techniques to preserve its delicate nature.
Preparation Considerations
Filet mignon benefits from minimal seasoning that enhances rather than masks its subtle flavor. Simple seasoning with salt and pepper applied 30-45 minutes before cooking allows the meat to develop flavor while maintaining its delicate character.
Room temperature preparation is crucial for filet mignon. The cut’s thickness requires even cooking throughout, and starting with cold meat can result in overcooking the exterior while waiting for the interior to reach proper temperature.
Grilling Techniques for Filet Mignon
High-heat grilling creates the necessary sear while preserving the tender interior. Preheat your grill to high heat, ensuring the grates are clean and well-oiled to prevent sticking. The delicate nature of filet mignon makes it prone to tearing if it sticks to the grates.
Sear the seasoned filet over direct high heat for 2-3 minutes per side, creating attractive grill marks and developing a flavorful crust. The goal is to create contrast between the caramelized exterior and the tender interior.
After searing, move the meat to medium heat or indirect heat to finish cooking. This two-stage approach prevents overcooking while ensuring the interior reaches the desired doneness. Medium-rare is generally considered optimal for filet mignon, preserving its tenderness and subtle flavor.
Temperature and Doneness
Use a reliable meat thermometer to monitor internal temperature. For medium-rare, aim for 130-135°F. The steak will continue cooking slightly during the resting period, so remove it from heat when it’s 5°F below your target temperature.
Avoid cooking filet mignon beyond medium, as higher temperatures compromise its signature tenderness and can result in a dry, less appealing texture.
Sauce and Accompaniment Suggestions
Filet mignon pairs beautifully with classic sauces that complement its mild flavor. Béarnaise sauce, with its rich, buttery texture and herb notes, creates a luxurious pairing. Red wine reduction sauces add depth and complexity without overwhelming the meat’s delicate taste.
Consider compound butters infused with herbs like thyme, rosemary, or tarragon. These additions provide aromatic complexity while maintaining the elegant simplicity that filet mignon deserves.
Explore more:
👉 Filet mignon grilling guide
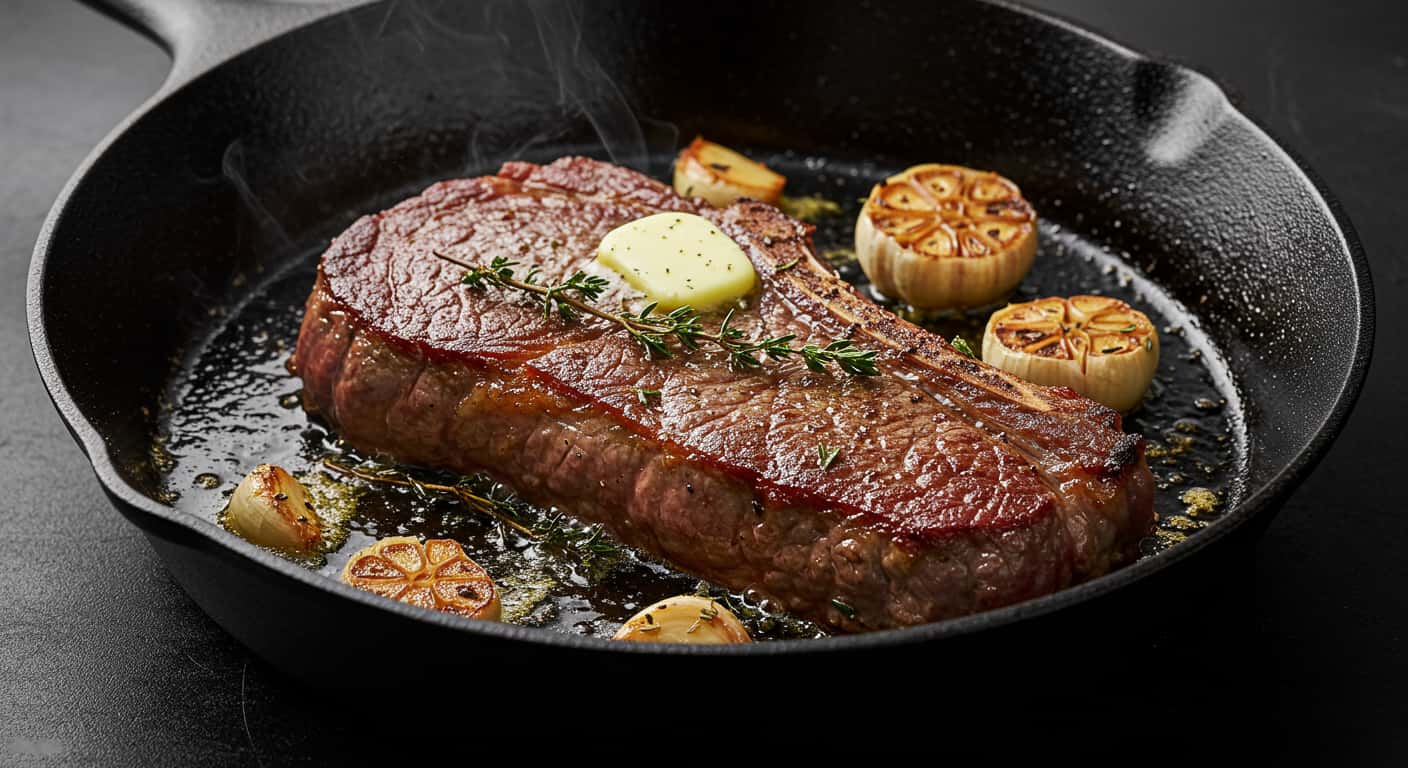
Porterhouse Steak: A Two-in-One Classic
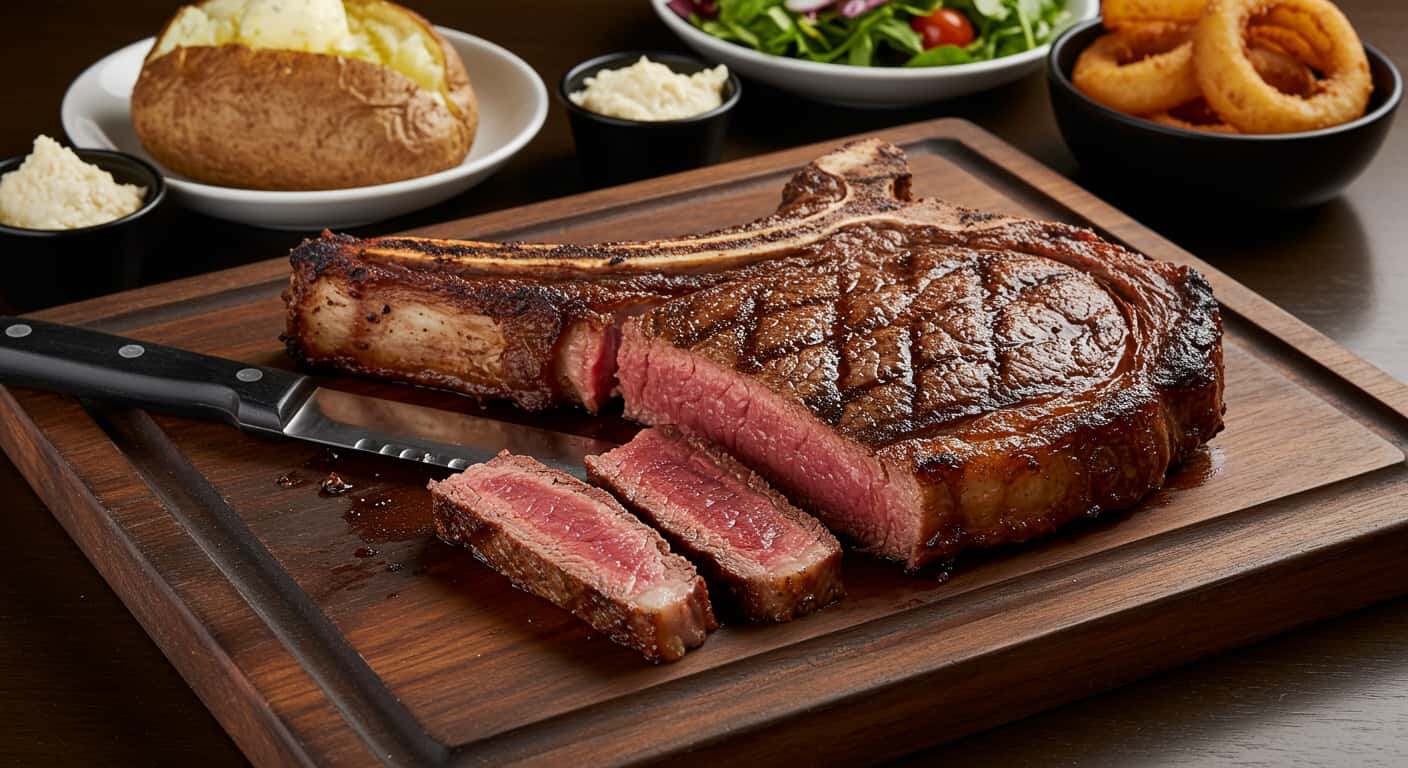
The porterhouse represents the ultimate expression of beef indulgence, combining two premium cuts in a single impressive presentation. Similar to the T-bone but featuring a larger portion of tenderloin, the porterhouse offers both the robust flavor of the strip side and the exceptional tenderness of the filet side.
This cut’s generous size makes it perfect for sharing, while its dual nature provides different eating experiences within the same meal. Understanding how to cook both sides to perfection simultaneously requires attention to detail and proper technique.
Understanding Porterhouse Composition
The porterhouse features the same T-shaped bone as the T-bone but with a more substantial tenderloin portion. USDA regulations specify that the tenderloin must be at least 1.25 inches wide at its widest point to qualify as a porterhouse rather than a T-bone.
This larger tenderloin section means the porterhouse offers more of the buttery, mild-flavored meat that makes filet mignon so prized. The strip side provides the robust, beefy flavor that many prefer, creating a well-rounded eating experience.
Cooking Methodology for Porterhouse
The dual nature of porterhouse requires careful heat management. The strip side cooks faster than the tenderloin, so positioning becomes crucial during the cooking process. Use a two-zone grill setup with direct high heat for searing and indirect medium heat for finishing.
Start by searing both sides over direct high heat for 3-4 minutes each, developing a flavorful crust. Position the porterhouse so the strip side faces the cooler area of the grill, allowing the tenderloin more time to cook evenly.
Temperature Management
Monitor both sides of the porterhouse during cooking, as they may reach desired doneness at different times. The strip side typically cooks faster and may need to be positioned away from direct heat sooner than the tenderloin side.
Use a meat thermometer to check internal temperature in both the strip and tenderloin portions. Aim for consistent doneness throughout, though some diners prefer the strip side slightly more cooked than the tenderloin.
Serving and Presentation
Porterhouse’s impressive size and distinctive appearance make it perfect for tableside presentation. Allow the cooked meat to rest for 8-10 minutes before carving, giving diners time to appreciate the anticipation.
When carving, separate the strip and tenderloin portions by cutting along the bone. Slice each portion against the grain and arrange on a warmed platter, allowing diners to experience both cuts’ unique characteristics.
Learn more:
👉 Porterhouse steak guide
Sirloin Steak: Affordable and Delicious
Sirloin offers exceptional value without compromising on flavor or quality. This versatile cut comes from the rear portion of the animal and provides excellent beef flavor at a more accessible price point than premium cuts. While leaner than ribeye or strip cuts, sirloin’s robust taste and adaptability make it a favorite among home cooks.
The cut’s moderate tenderness and pronounced flavor make it suitable for various cooking methods and applications. From simple grilled preparations to complex braised dishes, sirloin performs consistently well across different culinary contexts.
Varieties of Sirloin
Top sirloin represents the most tender and flavorful portion of the sirloin section. This cut features good marbling and tender texture that responds well to high-heat cooking methods. It’s excellent for grilling, pan-searing, or broiling.
Bottom sirloin, while less tender than top sirloin, offers excellent flavor and works well in applications where the meat will be marinated or slow-cooked. This cut benefits from techniques that break down tougher fibers while preserving its robust taste.
Preparation Techniques
Sirloin benefits from marinades that enhance its natural flavor while adding moisture. Simple marinades combining olive oil, garlic, herbs, and acid work effectively. Marinating time can range from 30 minutes to overnight, depending on the desired flavor intensity.
For dry seasoning, apply salt and pepper generously 30-40 minutes before cooking. The salt draws out moisture initially, then the meat reabsorbs this moisture along with the seasoning, creating enhanced flavor throughout.
Cooking Applications
Grilling: Sirloin performs excellently on the grill, developing attractive char marks while maintaining juicy interior. Cook over medium-high heat for 4-6 minutes per side, depending on thickness.
Pan-searing: Use a heavy-bottomed pan heated to medium-high. Sear for 3-4 minutes per side, creating a golden-brown crust while preserving interior moisture.
Stir-frying: Cut sirloin into thin strips against the grain for quick-cooking applications. The meat’s firm texture holds up well to high-heat stir-frying while absorbing flavors from sauces and seasonings.
Versatile Applications
Sirloin’s adaptability shines in various culinary contexts. Cube it for kabobs, slice it for fajitas, or use it whole for impressive grilled presentations. The cut’s ability to absorb flavors makes it excellent for international cuisine applications.
Consider using sirloin in pasta dishes, salads, or grain bowls where its robust flavor can stand up to bold seasonings and complementary ingredients.
| Preparation | Cooking Time | Temperature | Best Applications |
|---|---|---|---|
| Whole grilling | 4-6 minutes per side | Medium-high heat | Dinner centerpiece |
| Sliced stir-fry | 2-3 minutes | High heat | Asian dishes |
| Cubed kabobs | 8-10 minutes total | Medium-high heat | Outdoor cooking |
Explore more:
👉 Sirloin steak cooking tips
Steak Pasta Recipes: Comfort Food with a Twist
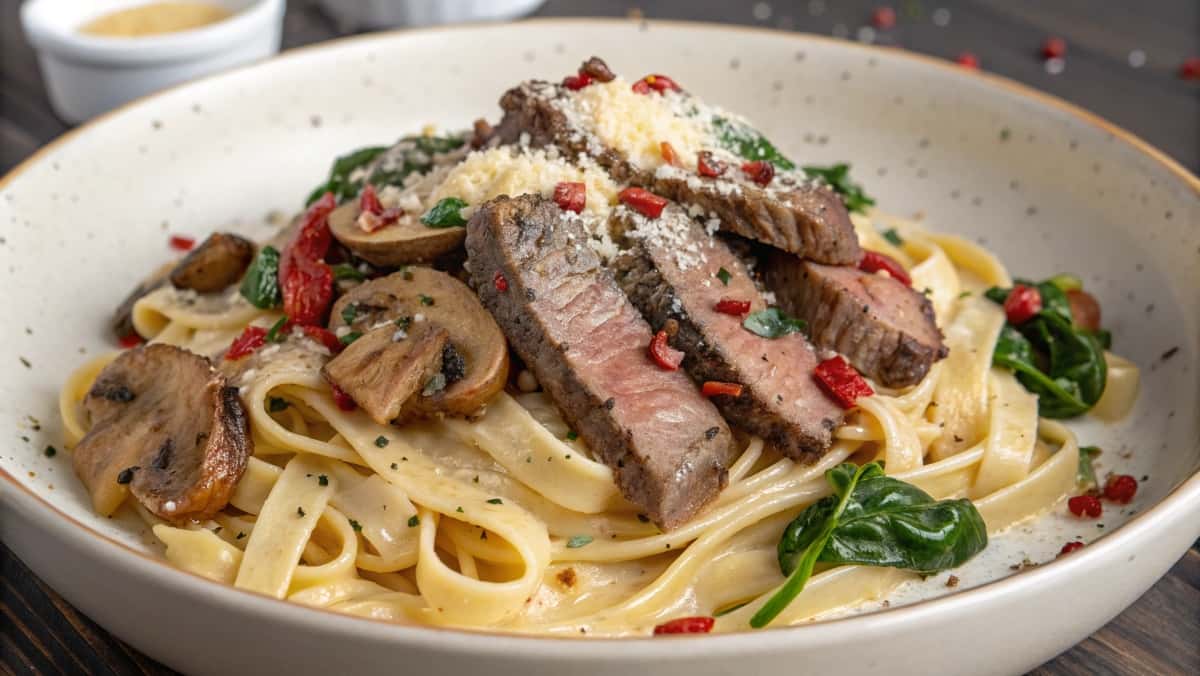
Combining premium beef with pasta creates hearty, satisfying meals that elevate both ingredients. This fusion brings together the rich, complex flavors of properly cooked meat with the comforting appeal of pasta, resulting in dishes that feel both familiar and sophisticated.
The key to successful beef pasta dishes lies in balancing the meat’s richness with complementary flavors and textures. Consider how the beef’s cooking method, seasoning, and cut will interact with the pasta shape, sauce, and additional ingredients.
Selecting Cuts for Pasta Dishes
Different cuts work better for various pasta applications. Tender cuts like filet mignon or strip work well when sliced and added to lighter pasta dishes, while more robust cuts like sirloin or flank can handle heartier, sauce-heavy preparations.
Leftover grilled beef often works excellently in pasta dishes, as the char flavors add complexity to the overall dish. The meat’s texture remains appealing when incorporated into pasta, providing satisfying protein content and rich flavor.
Creamy Mushroom Preparation
This classic combination pairs tender beef with earthy mushrooms in a rich cream sauce. Start by cooking sliced mushrooms until they release their moisture and develop golden color. Add heavy cream, herbs like thyme or tarragon, and finish with sliced cooked beef.
The cream sauce should coat the pasta without being overly heavy. Consider adding a splash of white wine or beef broth for additional depth. Fresh herbs brighten the dish and provide aromatic complexity.
Garlic Butter Linguine
Simple yet elegant, this preparation highlights the beef’s natural flavor while providing aromatic complexity. Cook linguine until al dente, then toss with butter, minced garlic, and sliced beef. The pasta’s long shape works well with the meat slices, creating attractive presentation.
Finish with freshly grated Parmesan cheese and cracked black pepper. The cheese adds richness while the pepper provides gentle heat that complements the beef’s flavor.
Mediterranean-Inspired Combinations
Consider preparations that incorporate Mediterranean flavors like sun-dried tomatoes, olives, and fresh basil. These ingredients provide bright, acidic notes that balance the meat’s richness while adding visual appeal.
Penne or rigatoni work well for these preparations, as their shape holds sauce and small ingredients effectively. The pasta’s tube shape creates interesting textural contrast with the meat slices.
Preparation Tips for Success
Cook pasta slightly underdone, as it will continue cooking when combined with hot sauce and meat. This prevents overcooking and maintains pleasant texture in the final dish.
Warm serving bowls to maintain temperature during service. Hot pasta dishes should be served immediately for optimal eating experience.
Try these:
👉 Steak pasta recipes
Essential Tips for Cooking Steak
Mastering beef cookery requires understanding fundamental principles that apply across different cuts and cooking methods. These essential techniques form the foundation for consistently excellent results, regardless of your experience level or the specific cut you’re preparing.
Temperature control represents the most critical aspect of successful beef cooking. Understanding how heat affects different cuts and knowing when to adjust temperature ensures optimal results every time.
Temperature Monitoring and Control
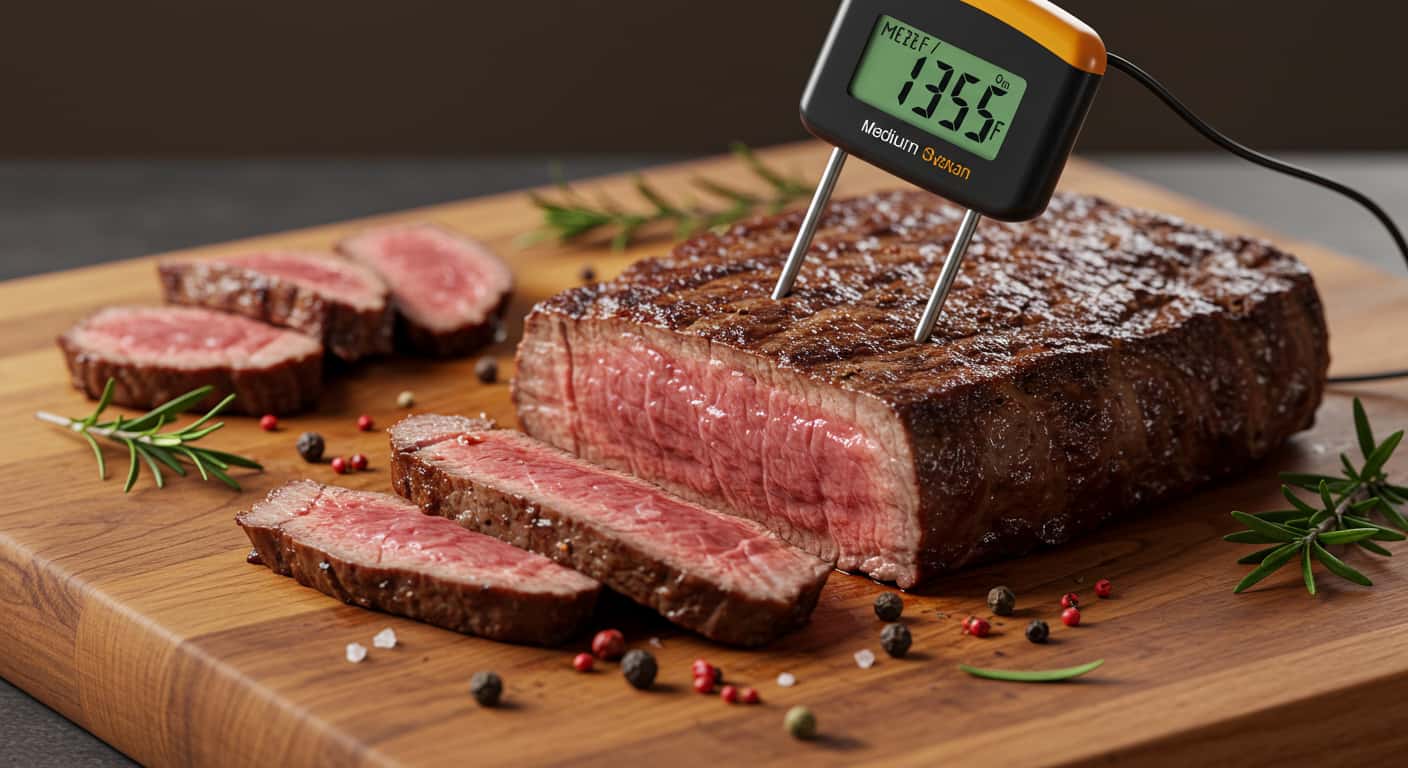
Invest in a quality instant-read thermometer for accurate temperature readings. This tool eliminates guesswork and ensures consistent results. Different cuts require different internal temperatures for optimal eating experience.
| Doneness Level | Internal Temperature | Characteristics |
|---|---|---|
| Rare | 120-125°F | Cool red center, very tender |
| Medium-rare | 130-135°F | Warm red center, optimal for most cuts |
| Medium | 140-145°F | Warm pink center, slightly less tender |
| Medium-well | 150-155°F | Slight pink center, firmer texture |
| Well-done | 160°F+ | No pink, firm texture throughout |
Resting: The Critical Final Step
Resting allows juices to redistribute throughout the meat, ensuring each bite remains moist and flavorful. This step is often overlooked but makes a significant difference in the final eating experience.
Rest time depends on the cut’s thickness and size. Smaller cuts need 5-7 minutes, while larger cuts may require 10-15 minutes. Tent loosely with foil to maintain temperature while allowing air circulation.
Seasoning Strategies
Salt timing affects both flavor and texture. Applying salt 40-45 minutes before cooking allows it to penetrate the meat surface, enhancing flavor throughout. For immediate cooking, season just before placing on heat to prevent moisture loss.
Pepper and other spices should be added closer to cooking time, as extended exposure to salt can make them bitter. Consider freshly cracked black pepper for superior flavor compared to pre-ground alternatives.
Heat Management Techniques
Oil the meat rather than the cooking surface to prevent sticking and ensure even browning. High-heat oils like avocado or grapeseed work best for searing, while olive oil suits medium-heat applications.
Avoid overcrowding the pan, which lowers temperature and prevents proper searing. Cook in batches if necessary to maintain optimal heat levels.
Common Mistakes to Avoid
Don’t flip meat repeatedly, as this prevents proper crust formation. Turn only once during cooking for optimal results. Use tongs rather than forks to avoid piercing the meat and losing juices.
Avoid pressing down on the meat while cooking, as this forces out juices and can result in dry texture. Let the heat do the work while you monitor temperature and timing.
How to Store and Freeze Steak Properly
Proper storage techniques preserve meat quality, extend shelf life, and ensure food safety. Understanding how to store both fresh and cooked beef prevents waste while maintaining optimal flavor and texture for future meals.
Temperature control remains crucial throughout the storage process. Bacteria multiply rapidly at temperatures between 40-140°F, making proper refrigeration and freezing essential for food safety.
Refrigeration Guidelines
Store fresh beef in the coldest part of your refrigerator, typically the bottom shelf toward the back. This area maintains the most consistent temperature and prevents contamination from items stored above.
Use original packaging for short-term storage (1-2 days), but rewrap for longer storage. Vacuum-sealed packages can extend refrigerator life to 3-5 days while maintaining quality.
Optimal Refrigerator Storage
Place meat on a plate or tray to catch any potential drips, preventing cross-contamination with other foods. Keep the refrigerator temperature at 40°F or below, and use a refrigerator thermometer to ensure accuracy.
Store different cuts separately to prevent flavor transfer. Strong-flavored marinades or seasonings can affect other foods if not properly contained.
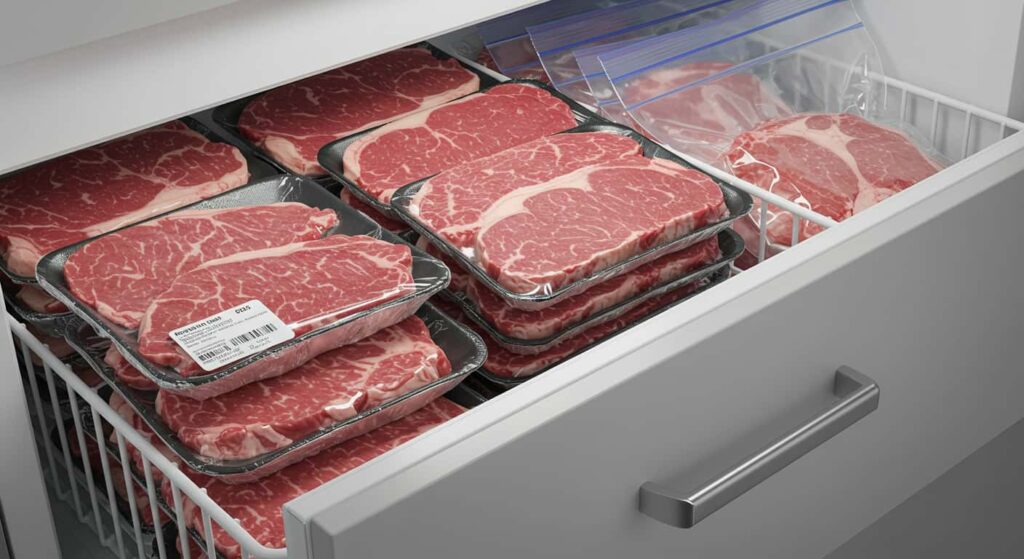
Freezing Techniques for Quality Preservation
Proper freezing maintains meat quality for months when done correctly. Remove meat from original packaging and wrap tightly in plastic wrap, then place in freezer bags or wrap in aluminum foil for additional protection.
Remove as much air as possible from packaging to prevent freezer burn. Vacuum sealing provides the best protection against air exposure and maintains quality longest.
Labeling and Organization
Label all frozen meat with the cut type, weight, and date of freezing. This information helps with meal planning and ensures you use older items first. Use freezer-safe markers that won’t smudge or fade.
Organize your freezer with older items in front and newer items behind. This rotation system prevents items from being forgotten and ensures optimal quality when used.
Thawing Best Practices
Plan ahead for thawing, as proper methods take time but preserve quality and safety. The safest method involves transferring frozen meat to the refrigerator 24-48 hours before cooking, depending on size.
For faster thawing, submerge sealed meat in cold water, changing water every 30 minutes. This method requires attention but thaws meat more quickly than refrigerator thawing.
Storage Duration Guidelines
| Storage Method | Duration | Quality Notes |
|---|---|---|
| Refrigerator (raw) | 3-5 days | Best quality when used quickly |
| Refrigerator (cooked) | 3-4 days | Reheat thoroughly before serving |
| Freezer (raw) | 6-12 months | Quality decreases over time |
| Freezer (cooked) | 2-3 months | Best quality within first month |
Frequently Asked Questions
How do I know when my meat is perfectly cooked?
The most reliable method involves using an instant-read thermometer to check internal temperature. Visual cues can be misleading, especially for beginners. For medium-rare, aim for 130-135°F. The meat should feel firm but yield slightly to pressure when properly cooked.
What’s the ideal cut for grilling beginners?
NY strip and ribeye represent excellent choices for beginners. Both cuts are forgiving, develop excellent flavor when grilled, and maintain tenderness even if slightly overcooked. Their marbling provides natural moisture that helps prevent drying out.
Can I cook frozen meat directly?
While possible, cooking from frozen requires longer cooking times and may result in uneven doneness. For best results, thaw meat in the refrigerator overnight. If time is limited, use cold water thawing but ensure the meat reaches room temperature before cooking.
How do I prevent my cuts from becoming tough?
Avoid overcooking, which is the primary cause of toughness. Use proper slicing techniques, particularly for cuts like flank. Allow adequate resting time after cooking, and consider marinating tougher cuts before preparation.
What’s the difference between grilling and pan-searing?
Grilling imparts smoky flavor and attractive char marks, while pan-searing allows better temperature control and easier monitoring. Both methods create excellent results when executed properly. Choose based on your equipment and desired flavor profile.
How long should I marinate different cuts?
Tender cuts like filet mignon need minimal marinating (30 minutes to 2 hours), while tougher cuts like flank benefit from longer marinating (2-24 hours). Over-marinating can break down proteins excessively, resulting in mushy texture.
Explore More Steak Resources
Mastering beef cookery is a journey that rewards practice and experimentation. Each cut offers unique characteristics and possibilities, from simple weeknight dinners to elaborate special occasion meals. The techniques and knowledge outlined in this guide provide the foundation for countless delicious meals.
“Great cooking is about understanding your ingredients and respecting their natural qualities. With beef, this means choosing the right cut for your intended preparation and treating it with the care it deserves.” – Chef Gordon Ramsay
Continue exploring different cuts, techniques, and flavor combinations to develop your personal style and preferences. The world of beef cookery offers endless opportunities for creativity and satisfaction.
Whether you’re planning a romantic dinner, hosting a backyard barbecue, or simply wanting to elevate your weeknight meals, these techniques and insights will help you achieve consistently excellent results. Remember that great cooking comes from understanding your ingredients, practicing proper techniques, and paying attention to details.